You probably don’t need us to tell you that there are a lot of things that can slow down your PC. If you’re looking to improve the overall speed of your machine, we’re here to continue some useful tips to help you along.
Earlier, I began a series of quick tips to speeding up your computer. In that article, we covered Computer Settings, Startup Programs, Disk Cleanup, and Adware & Bloatware removal. This time we are going to continue with a few more tips on increasing the performance of your computer. For those who did not read the first article but would like to, check out 4 Quick Tips To Speed Up Your PC.
Defragment Your Hard Drive
Lets talk about organization. Your hard drive must organize the data that is put on it. With more data comes more responsibility. So, to help your hard drive stay organized it is recommended that you defragment your hard drive regularly.
Defragmentation involves moving all of the files on your hard disk so that the operating system can read them more quickly and efficiently. Usually this is done automatically by your operating system but sometimes it can be missed.
(Note: If you have a SSD then it is not recommended to Defragment your Drive because it could shorten its’ life.)
To Defragment your hard drive
1: Go to the Start menu.
2: Scroll down to Windows Administrative Tools and click.
3: Select and Click Defragment and Optimize Drives.
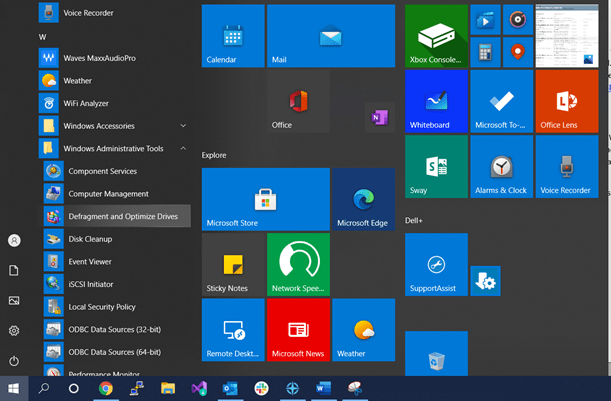
4: Select the drive you would like to Defragment and Click Optimize.
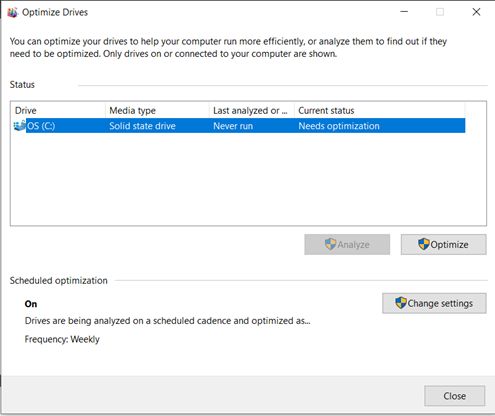
5: Wait for Defrag to complete its work.
Adjust PC Power Settings
After defragmenting, your computer might still be slow. This is a good opportunity to change your power settings. There are 3 types of default power settings: Power Saver, Balanced, and High-Performance. Having your computer set to Power Saver saves on power usage but at the cost of performance, which can slow down your computer. The Balanced setting is the in between for the other two settings. Lastly, the High-Performance setting uses more power to get the best performance. The later of the settings will eat up the power of your battery provided you are using a Laptop.
To change your Power settings
1: Go to the Start Menu
2: Click on Windows System and Select Control Panel.

3: In Control Panel Click on System and Security
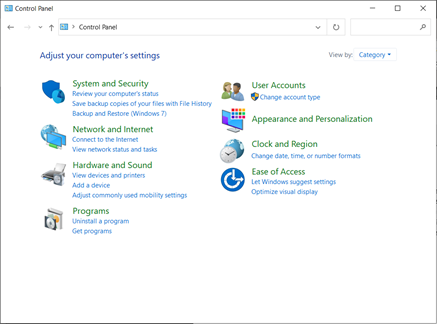
4: Click on Power Options.
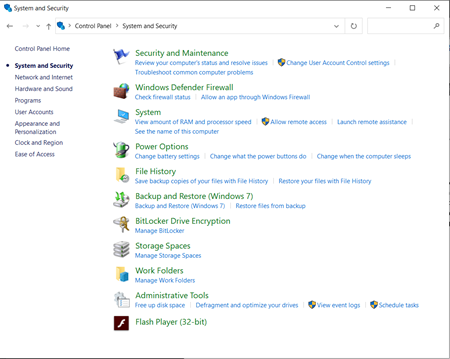
5: Select the High-Performance.
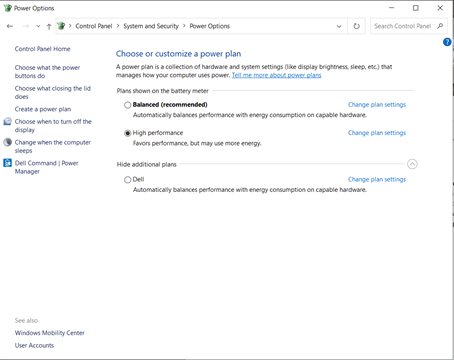
(Note: If you have Control Panel set to Large or Small Icons then click on Power Settings.)
Turn Off File Indexing
Now that you have set your power settings to your liking, lets move on to Indexing. Indexing allows you to use the Windows 10 search function more efficiently. It does this by indexing the files on your drives.
The Indexing Service uses CPU and RAM to search for a file that you want to find. This can slow down a computer that is already taxed on CPU and RAM usage. By turning file indexing off, it can help speed up your PC.
To shut down the Windows Indexing Service
1: Go to the Start Menu and scroll to Windows Administrative tools and click, then select and click Services.

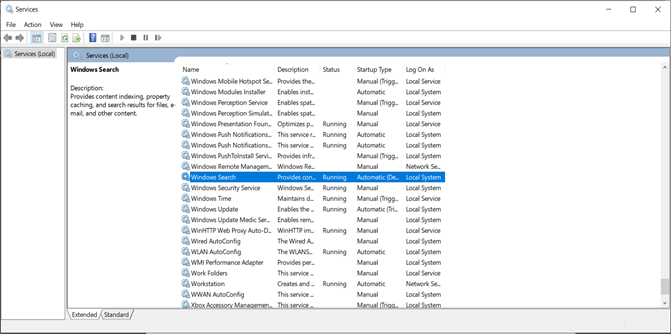
2: When the Services Window opens, scroll down to “Windows Search” and Right click on it and select Properties.
3: In the Properties window click on “Stop”.
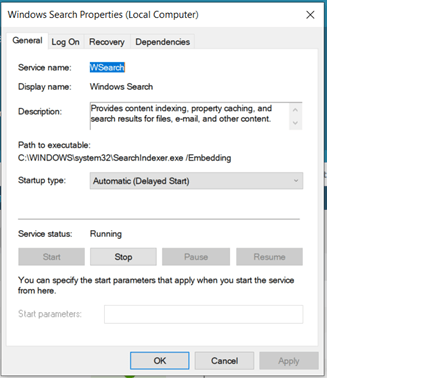
The Windows Search service is the active Indexing service. Stopping this service will free up resources at the cost of being able to search quickly for your files or apps.
(NOTE: While performing actions within Services, you must have administrator privileges to make changes)
Alternatively, you can turn off the file indexing for specific folders and locations by going to Start > Settings > Control Panel. Then select System and Maintenance. Click the Advanced tab, and under Performance Options, uncheck Index Now.
Adjust Paging File
The next item we will look at is the system paging file. This is often called Virtual Memory. This is space on your drive, usually on the C: Drive, where data can be stored that was not able to fit on the RAM of your machine. Usually, windows automatically manages this for you but sometimes you do have to take matters into your own hands. If you do not feel comfortable with changing the paging file, I recommend reading more about it and making your best judgement.
To Adjust the Windows Paging File
1: Click on File Explorer, which is the folder icon, on your task bar at the bottom of the screen.
![]()
2: While in File Explorer, Right click on “This PC” and select “Properties”.
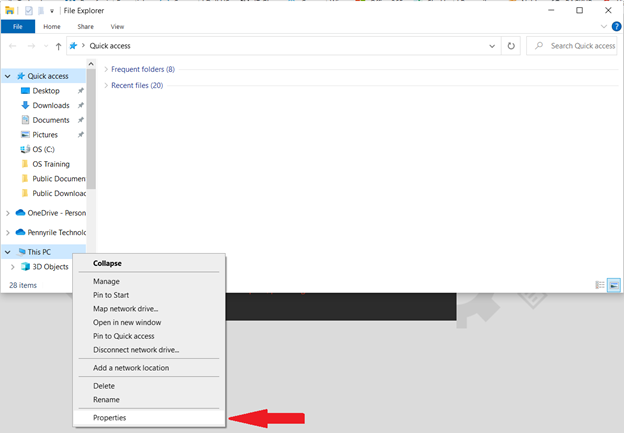
3: In the System Window, Click on Advanced Settings.
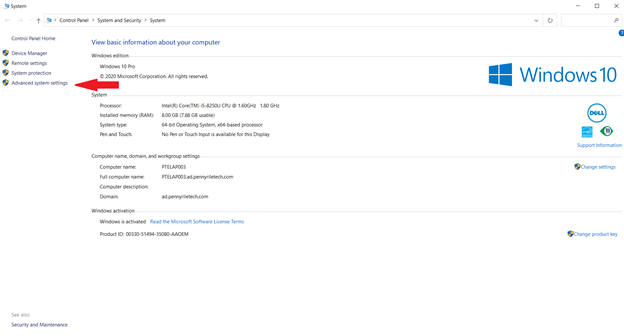
4: In System Properties, Click Settings under Visual Performance.
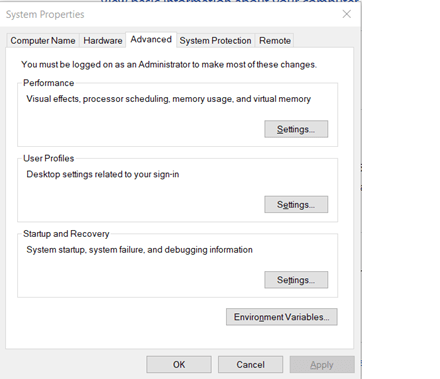
5: At the top of the Performance Options window, click the Advanced Tab and click Change under Virtual Memory.
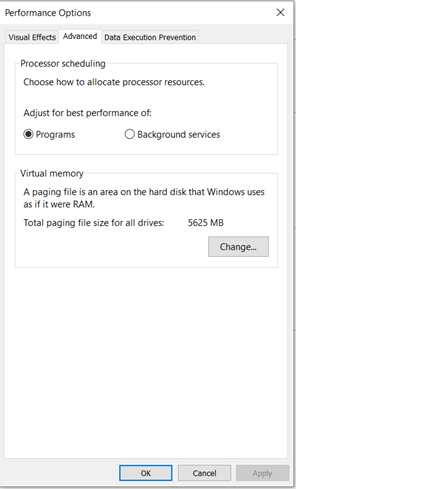
6: In this window, you will need to know how much RAM you have in your computer. Below is the recommended setting for a computer with 8GB of RAM. To figure out how much Virtual Memory you will need, Multiply the amount of Ram you have by 1024. Then Multiply that with 1.5 and 4. They will both be the minimum and Maximum amount of Virtual Memory you will want.
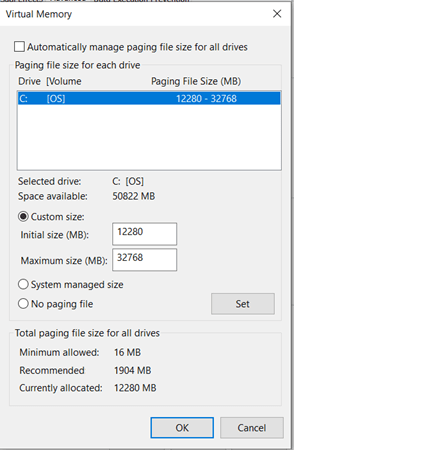
Here is how I figured the Initial Size and Maximum Size.
I have 8GB of RAM
1GB of RAM is 1024
You would want at least 1.5 times the amount of Virtual Memory for your Initial Memory and 4 times that for your Maximum.
8GB Multiplied by 1024 would be 8194
8194 Multiplied by 1.5 would be 12280
8194 Multiplied by 4 would be 32768
I hope this Article helps to speed up your PC. Please keep a look out for future articles where I will telling you how to set up Ready Boost and a couple of other ways you can potentially speed up your computer.

